# Feature branch workflow
In a team, working on the same main branch quickly leads to problems. The feature branch workflow solves this by giving each task its own isolated branch. This is the workflow you'll use for all team projects in this course.
REMARK
GitHub renamed the default branch (opens new window) from master to main in October 2020. You may still encounter the term master in older documentation online — it means the same thing as main.
The basic (or centralized) workflow only uses one/the default main branch resulting in a lot of disadvantages, especially when working in a (large) team on a (large) project
- You can't release urgent changes because of an incomplete feature
- Your code is not reviewed by team members leading to more bugs
- You tend to have more (complex) merge conflicts
- ...
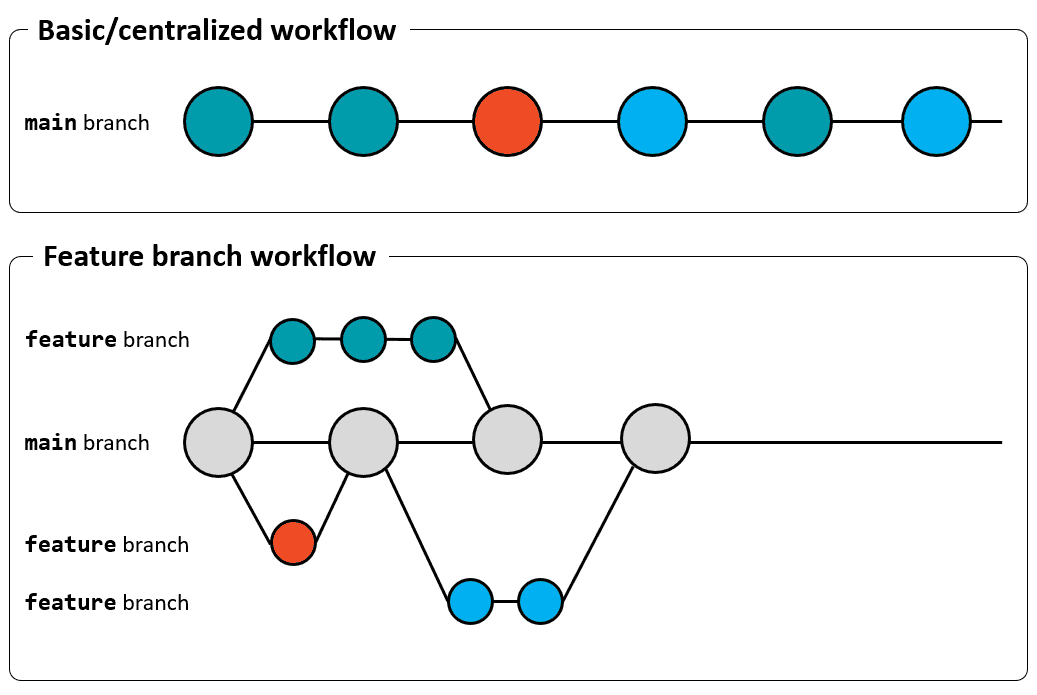 For team projects, it is therefore considered to be good practice to use the feature branch workflow, where multiple branches (one for each feature) are used
# Branch naming
A good branch name includes your initials (so the team knows who's working on what) and a short description of the task. Use lowercase and hyphens (not spaces or underscores).
- Example:
jj-change-home,jj-fix-navbar,jj-add-contact-form - ❌
my-branch— too vague - ✅
jj-add-contact-form— clear and informative
PRO TIP: Branch prefixes
Some teams use prefixes to categorize branches. This is optional but can help keep things organized in larger projects:
| Prefix | Use case | Example |
|---|---|---|
feature/ | New functionality | feature/jj-add-login-page |
fix/ | Bug fixes | fix/jj-broken-navigation |
hotfix/ | Urgent production fixes | hotfix/jj-security-patch |
refactor/ | Code improvements (no new features) | refactor/jj-clean-up-css |
# Workflow description
Suppose you have to take care of a specific project feature/task (implement a new functionality, fix a bug, etc.)
# Step 1: Make sure main is up-to-date
Before creating a new branch, always start from the latest version of main:
$ git switch main
$ git pull
2
# Step 2: Create a new branch and switch to it
Use git switch -c to create a new branch and switch to it in one command:
$ git switch -c jj-change-home
This single command creates the branch jj-change-home and switches to it immediately.
OLDER ALTERNATIVE: `git checkout`
In older tutorials and documentation, you will often see git checkout used instead of git switch:
# Create and switch to a new branch
$ git checkout -b jj-change-home

# Switch to an existing branch
$ git checkout main
2
3
4
5
git checkout still works, but git switch is the modern recommended alternative. The reason? git checkout does many different things (switch branches, restore files, etc.), which can be confusing. git switch does only one thing: switch branches.
# Step 3: Do your magic on this branch
Work on your feature with regular commits:
git add .git commit -m "commit message"git push
If it's your first time pushing this branch, Git will ask you to set the upstream. Copy, paste and execute the full push command Git shows you:
$ git push --set-upstream origin jj-change-home
TIP: Commit messages
Write clear, descriptive commit messages that explain what you changed and why:
- ❌
"fixed stuff"or"update" - ✅
"fix: correct navbar alignment on mobile" - ✅
"feature: add contact form validation"
# Step 4: Keep your branch up-to-date (important!)
While you're working on your feature, your teammates may have merged other branches into main. To avoid big merge conflicts later, regularly update your feature branch with the latest changes from main:
# Switch to main and get the latest version
$ git switch main
$ git pull

# Switch back to your feature branch
$ git switch jj-change-home

# Merge the latest main into your branch
$ git merge main
2
3
4
5
6
7
8
9
WHY IS THIS IMPORTANT?
If you skip this step and main has changed significantly, you will likely face large, complex merge conflicts when you create your pull request. By merging main into your branch regularly, you deal with small, manageable conflicts as they arise.
# Step 5: Create a Pull Request (PR)
When your feature is ready and pushed, it's time to ask your team to review and merge your work:
- Go to the GitHub page of your repository
- You'll often see a banner: "Your branch has recent pushes — Compare & pull request". Click it!
- Alternatively: click the "Pull requests" tab → "New pull request"
- Fill in the pull request form:
- Title: A clear summary of what your branch does (e.g. "Add contact form with validation")
- Description: Explain what you changed, why you changed it, and anything reviewers should pay special attention to
- Reviewers: Assign one or more team members to review your code
- Click "Create pull request"
WHAT MAKES A GOOD PULL REQUEST?
- A descriptive title (not just the branch name)
- A short summary of the changes and the reasoning behind them
- Small, focused changes — one feature or fix per PR (avoid "mega-PRs" with 50 changed files)
- Self-review first — look through your own changes on GitHub before requesting a review
# Step 6: Code review
When reviewing a pull request, you have 3 options:
- Approve: submit your feedback and approve merging the changes proposed in the pull request
- Comment: leave general feedback without explicitly approving the changes or requesting additional changes
- Request changes: submit feedback that must be addressed before the pull request can be merged
REMARK
If you (are asked to) update your code, be sure to switch back to the specific branch (git switch ...) to commit/push the necessary corrections.
# Step 7: Merge and clean up
After approval, merge the pull request on GitHub, then clean up your branches:
# Switch back to main and pull the merged changes
$ git switch main
$ git pull

# Delete the local feature branch (it's been merged, you don't need it anymore)
$ git branch -d jj-change-home
2
3
4
5
6
WHY DELETE THE BRANCH?
Feature branches are temporary by design. Once merged, they've served their purpose. Keeping old branches around clutters your project — you can always find the history in the merged commits.
You can also delete the branch on GitHub directly after merging via the button in the pull request interface.
🔁 Now start over from Step 1 with your next task!
WARNINGS
When you work on your project, always check first (use git status) whether you have really switched to a feature branch!
NEVER make any project changes on the main branch!
# Flowchart
The following flowchart summarizes the complete workflow described above:
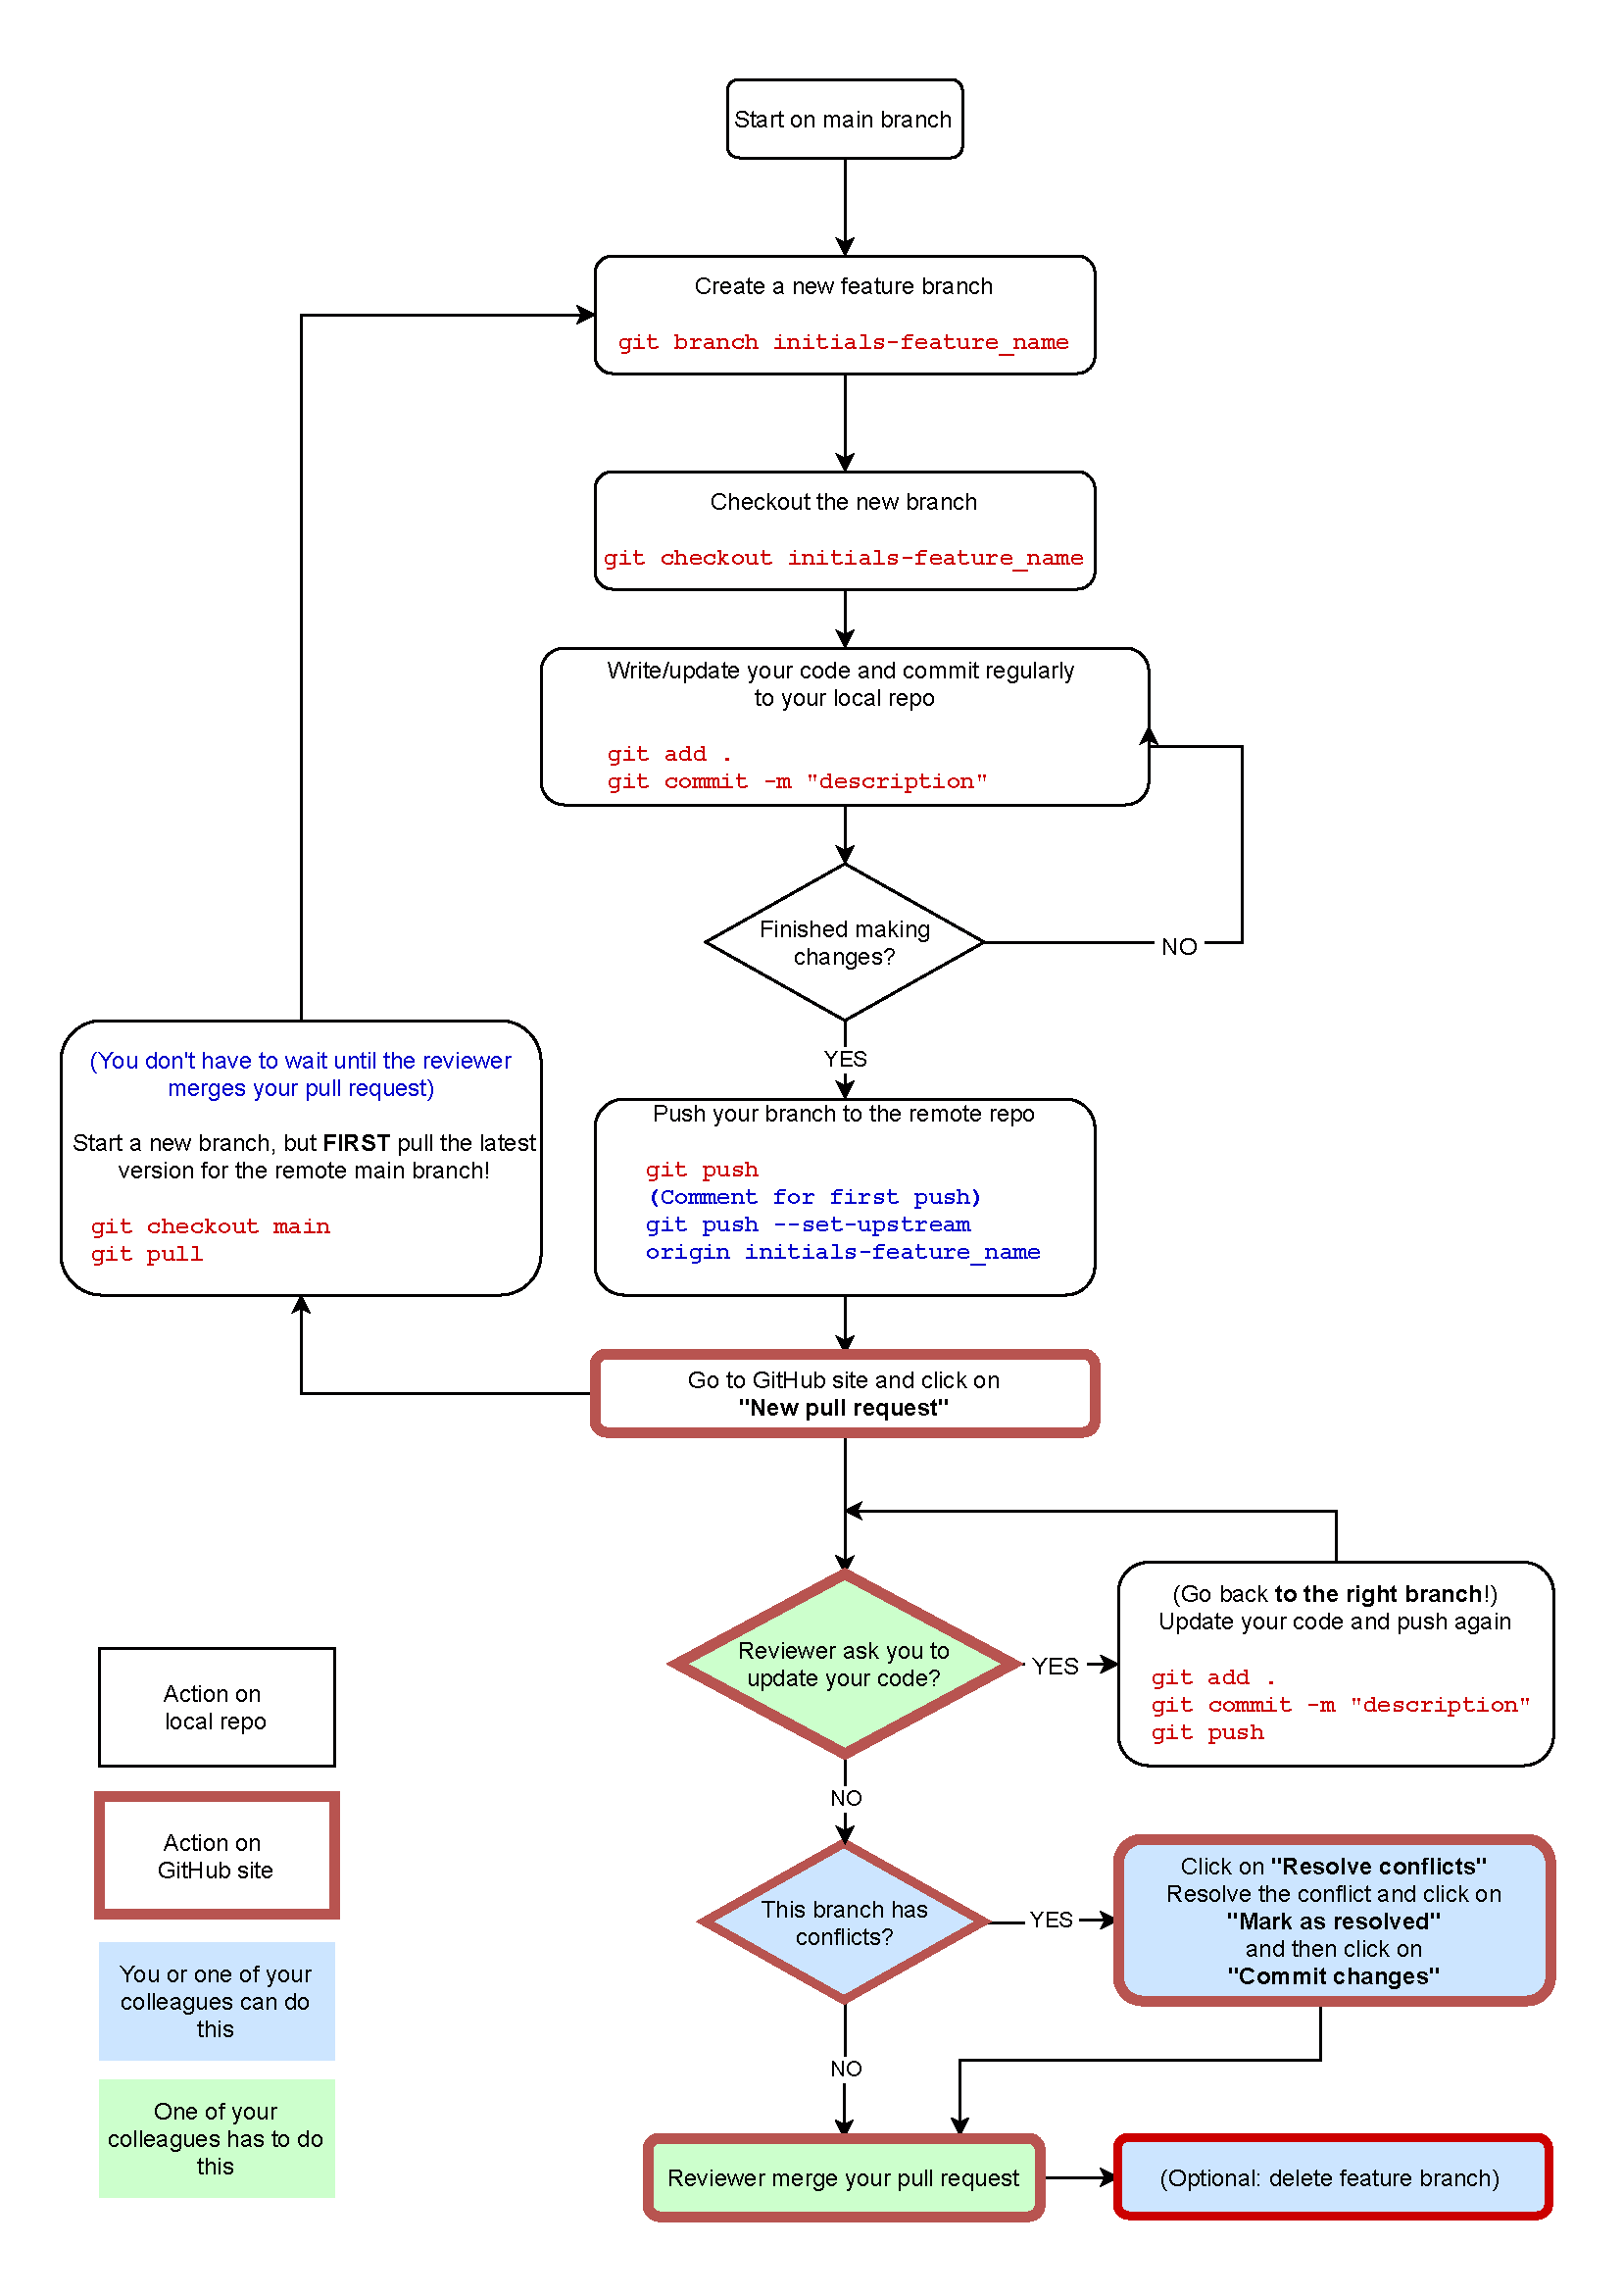
Download Feature branch workflow - Flowchart as PDF.
# Example scenarios
In the screen capture below, this flowchart is illustrated by means of two example scenario's (without and with conflict)
You can download Feature Branch workflow - Example scenarios as PDF.
WHAT'S NEXT?
- 🎮 Want to practice branching interactively? Try Learn Git Branching (opens new window)
- Learn how to deal with conflicts in Merge Conflicts
- Discover essential everyday commands in Useful Git Commands
- Quick reference? See the Cheat Sheet