# Back end: Vercel hosting
Vercel (opens new window) is a (free for hobby use) web hosting service ideal for dynamic websites and serverless functions. It simplifies the deployment and hosting process for developers.
Like other modern hosting platforms, Vercel offers built-in DNS management, free SSL certificates, and powerful automation for your deployment process using GitHub. Vercel can continuously monitor your main branch and deploy a new version every time a change is pushed.
For this setup, we will configure Vercel to deploy our back-end project and use GitHub Actions to manage the deployment pipeline, triggered by pushes to the main branch.
# Setting up your Vercel Account
First, you'll need a Vercel account.
- Go to https://vercel.com/signup (opens new window).
- Select the hobby plan ("I'm working on personal projects" checked).
- Enter your name and click Continue.

- When prompted for the Git provider, choose GitHub.
- Complete the registration process, which may include verifying your phone number.
# Initial Project Setup with Vercel CLI
We assume your back-end project is already on your local machine and set up in PyCharm.
- Open your back-end project in PyCharm.
- Open the terminal within PyCharm.
- Install the Vercel CLI globally by running the following command:
npm install -g vercel1 - Log in and link your project by running the
vercelcommand in your project's root directory:You will be prompted with several questions. Follow these guidelines:vercel1- Set up and deploy “path/to/your/project”? Type
y(or accept defaultyes) and press Enter. - Which scope should contain your project? Select your personal scope (
<your_username> projects) and press Enter. - Link to existing project? Type
n(for no) and press Enter. We are creating a new Vercel project for this local codebase. - What’s your project’s name? Enter a URL-friendly name for your project.
This will be part of your Vercel domain. For example:backend-4xx-2025.
Your default domain will then be something likehttps://backend-4xx-2025.vercel.app. - In which directory is your code located? The default is usually
./(the current directory). Press Enter to accept it.
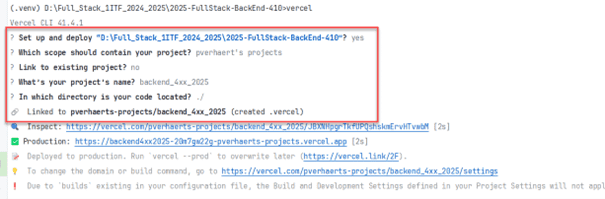
- Set up and deploy “path/to/your/project”? Type
- After the CLI finishes, it will have:
- Created a new project on Vercel.
- Linked your local directory to this Vercel project.
- Created a
.vercelfolder in your project's root directory, containing aproject.jsonfile.
# Gathering Vercel Project Identifiers
The vercel CLI created a .vercel/project.json file in the root of your local project. This file contains crucial
identifiers.
- Open the
.vercel/project.jsonfile. It will look something like this:{ "projectId": "prj_xxxxxxxxxxxxxxxxxxxxxxxxxxxx", "orgId": "team_xxxxxxxxxxxxxxxxxxx" }1
2
3
4 - Create a temporary scratchpad file (e.g., a plain text file on your desktop) or keep a note of the following,
which you'll need for GitHub Actions secrets:
- Groep: (Your group, e.g., 4xx or 6xx - for your reference)
- VERCEL_PROJECT_ID:
prj_xxxxxxxxxxxxxxxxxxxxxxxxxxxx(copy fromproject.json) - VERCEL_ORG_ID:
team_xxxxxxxxxxxxxxxxxxx(copy fromproject.json) - VERCEL_TOKEN: (We will get this in a later step)

# Configuring Project Settings on Vercel
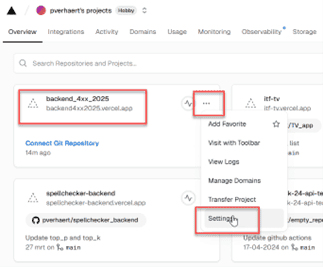
Now, let's configure some settings for your newly created project on the Vercel dashboard.
- Go back to https://vercel.com/ (opens new window). You should automatically land on your dashboard.
- Find your newly created project. Click on the three dots (...) next to your project name and select Settings
from the dropdown menu.
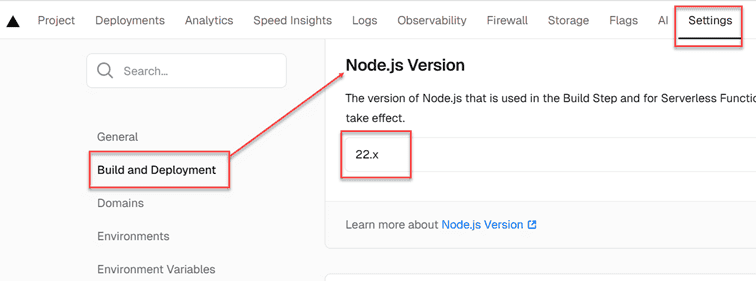
- Set Node.js Version:
- In the project settings menu on the left, select Build & Development Settings.
- Scroll down to Node.js Version.
- Select version 22.x from the list.
- Click Save.
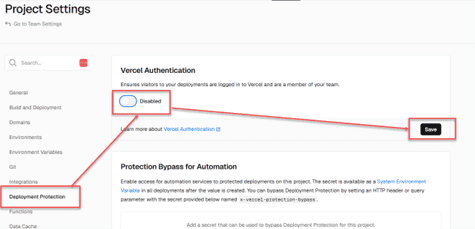
- Configure Deployment Protection:
- In the project settings menu, select Deployment Protection.
- Disable Vercel Authentication by toggling the switch to "Disabled". This ensures your API is publicly accessible as intended.
- Click Save.
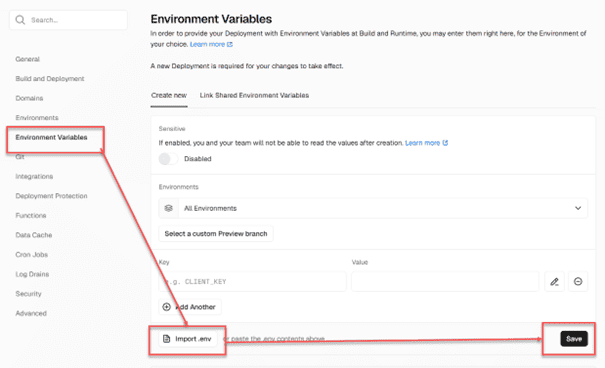
- Set Environment Variables:
- In the project settings menu, select Environment Variables.
- Your application likely relies on a
.envfile for configuration (e.g., database connection strings, Docs URL, ...). Since.envfiles should not be committed to Git, you need to add these variables to Vercel. - Click on Import .env File.
- Locate and select your local
.envfile from your project repository. - Crucially, verify that the imported
.envfile contains all necessary variables with their correct values for the production environment. - Ensure the variables are set for "Production," "Preview," and "Development" environments as needed, or "All Environments".
- Click Save after adding/importing variables.
# Generating a Vercel Access Token
To allow GitHub Actions to deploy to your Vercel project, you need an Access Token.
- Navigate to your Vercel account settings: https://vercel.com/account/settings/tokens (opens new window).
- Click on Create to make a new token.
- Configure the token:
- TOKEN NAME: Give it a descriptive name, e.g.,
GitHub Actions Deploy. (The name itself isn't critical for functionality). - SCOPE: Select your account (
<your_username> projects) to give it access to your projects. - EXPIRATION: Choose an expiration period.
1 yearis a common choice. If you plan to use Vercel long-term for this project, you might considerNo Expiration, but be mindful of the security implications.
- TOKEN NAME: Give it a descriptive name, e.g.,
- Click Create.
- Immediately copy the generated token. This is the only time Vercel will show it to you.
- Add this token to your scratchpad file:
- VERCEL_TOKEN:
your_copied_vercel_access_token

- VERCEL_TOKEN:
# Set up the GitHub Repository Secrets
Now, we'll add the Vercel identifiers and token as secrets to your GitHub repository so GitHub Actions can use them.
REMARK
Before doing these steps, ensure you have admin privileges or sufficient permissions on your GitHub repository. You need to ask your teacher to perform these steps to grant you the necessary permissions.
- Open your project's repository on GitHub.
- Look at the file
.github/workflows/buildAndDeployOnVercel.yml. This file defines the automated deployment to Vercel.
- The workflow file will reference three secrets:
VERCEL_ORG_IDVERCEL_PROJECT_IDVERCEL_TOKEN
- To add these secrets:
- In your GitHub repository, go to Settings.
- In the left sidebar, under "Security," select Secrets and variables -> Actions.
- Click on New repository secret for each of the three secrets.
- Name:
VERCEL_ORG_ID-> Value: (Paste theorgIdfrom your scratchpad) - Name:
VERCEL_PROJECT_ID-> Value: (Paste theprojectIdfrom your scratchpad) - Name:
VERCEL_TOKEN-> Value: (Paste the Vercel Access Token from your scratchpad)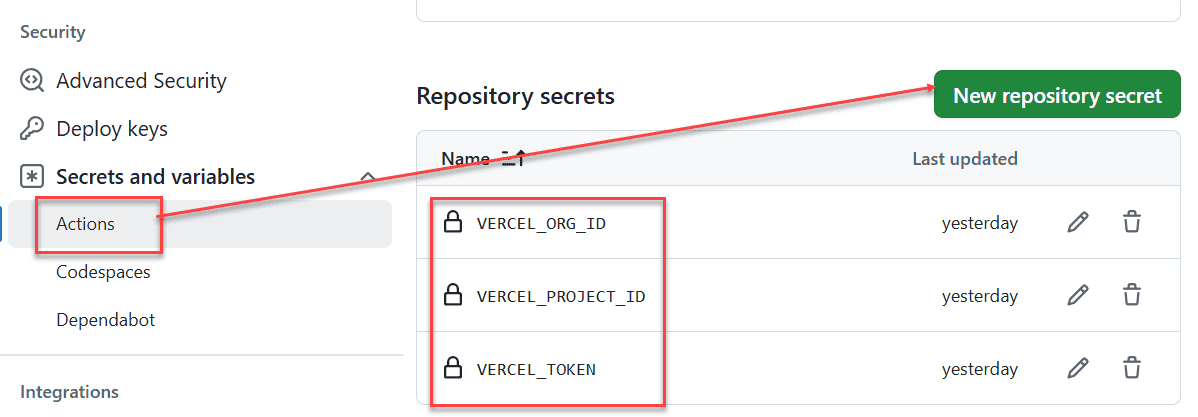
- Name:
WARNING
Use the names VERCEL_ORG_ID, VERCEL_PROJECT_ID, and VERCEL_TOKEN exactly as shown, including capitalization and
underscores. These names are referenced directly in the GitHub Actions workflow file.
- Done! With these settings and secrets in place, the next time a pull
request is merged to
mainbranch, GitHub Actions should automatically build and deploy your application to Vercel.
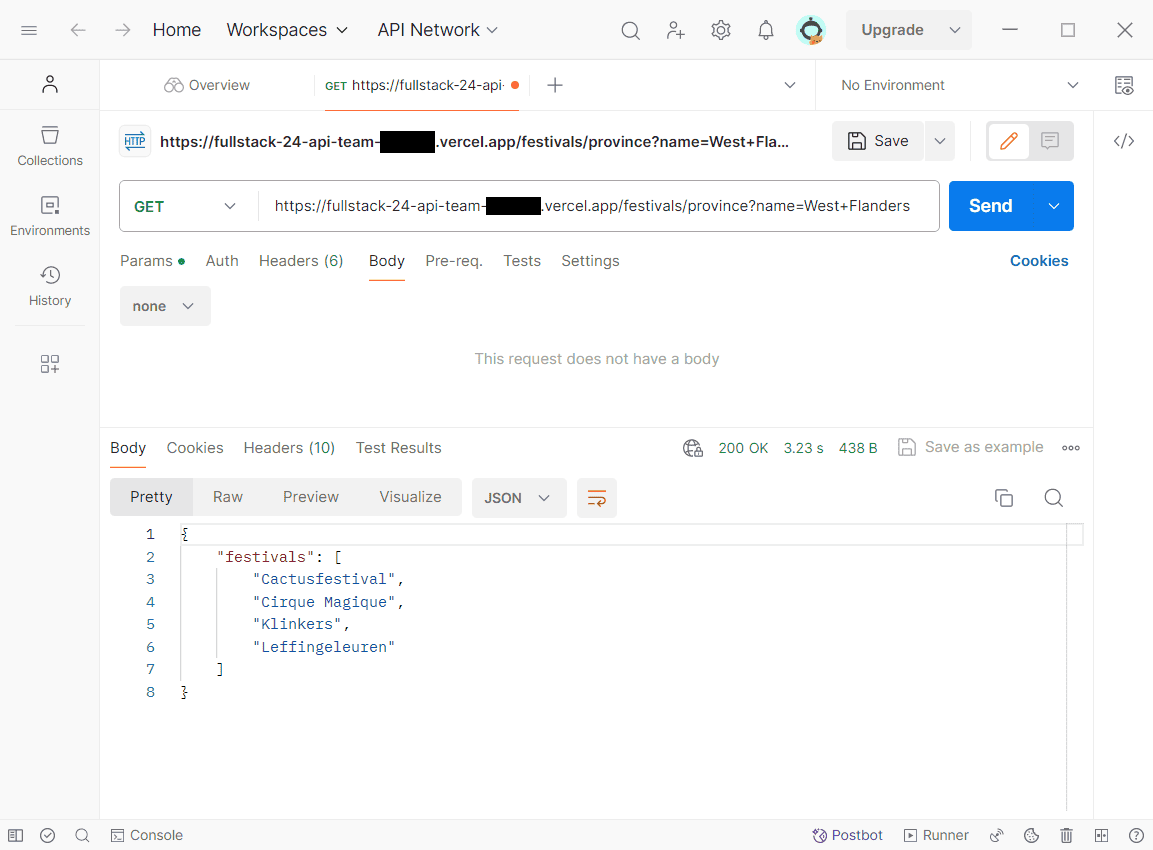
# Accessing Your Deployed API
Be careful
Your API now automatically deploys upon changes to the main branch. Ensure that every commit merged to main contains
stable, working code. This API will be publicly accessible, so only push code you are confident in.
To find the URL of your hosted API:
- Go to your Vercel dashboard (https://vercel.com/ (opens new window)).
- Select your project.
- On the project's overview page, look for the Domains section. Your primary URL (e.g.,
https://your-project-name.vercel.app) will be listed there.
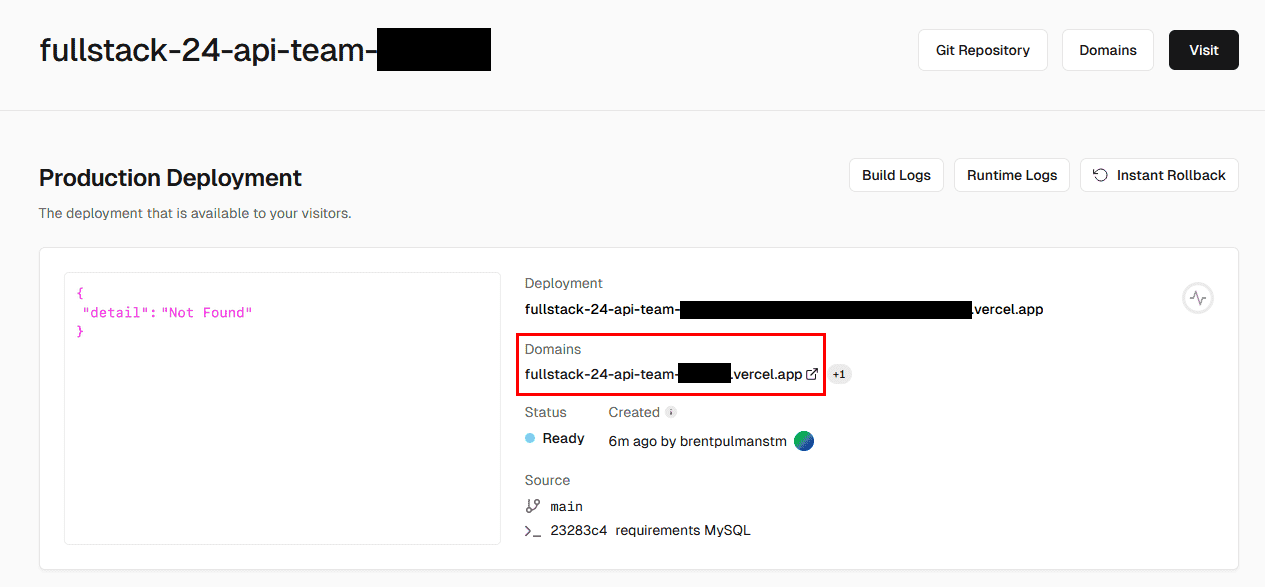
You can now use this URL to access your API from tools like Postman, your front-end application, or any other client.